Domain, meteorology, and configuration
This section discusses:
Setting up the domain using WPS’s
geogrid.exetool.Processing the meteorological initial and boundary conditions by downloading, running WPS’s
ungrib.exe, andmetgrid.exe.Basic configuration of WRF-GC using the
namelist.input.Using WRF’s
real.exeto prepare input before adding in chemical initial/boundary conditions.
Note
The WRF Pre-Processor can be learned best from the WRF User’s Guide, as this is not specific to chemistry.
An overview of the workflow of the WRF Pre-Processor system (by Xu Feng):
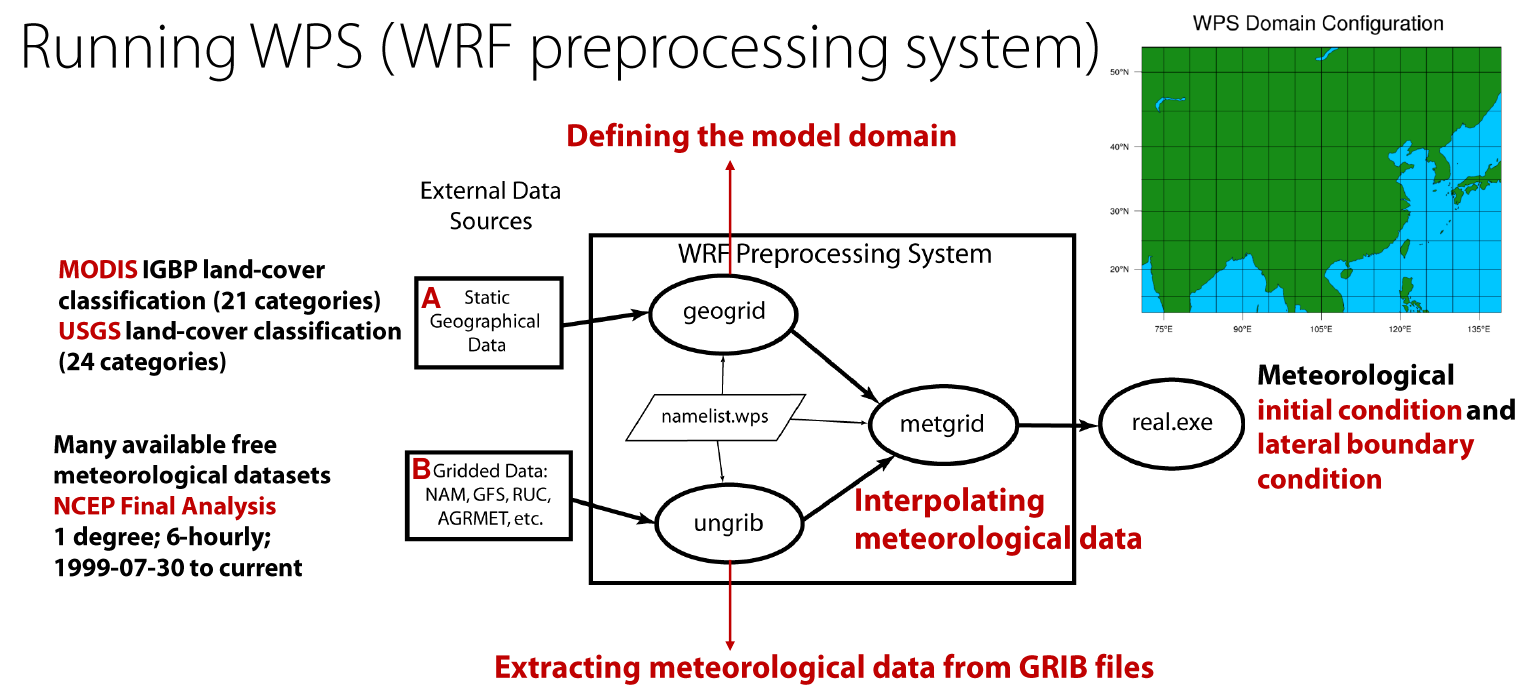
The data in “A” is described in WRF Pre-Processor Geographical Data. The data in “B” is described below in Downloading meteorological data.
Setting up the domain using GEOGRID
Configuration of the WPS is done in namelist.wps file under the WPS directory.
The first step is to describe your simulation domain. Example entries for the namelist.wps file’s &share and &geogrid sections are below:
&share
 wrf_core = 'ARW',
 max_dom = 1,
 start_date = '2016-06-27_00:00:00',
 end_date   = '2016-06-29_00:00:00',
 interval_seconds = 21600
 io_form_geogrid = 2,
 debug_level = 1,
/

&geogrid
 parent_id         =   1,
 parent_grid_ratio =   1,
 i_parent_start    =   1,
 j_parent_start    =   1,
 e_we = 245,
 e_sn = 181,

 geog_data_res = 'gtopo_2m+usgs_2m+nesdis_greenfrac+2m+albedo_ncep+maxsnowalb_ncep', 'gtopo_2m+usgs_2m+nesdis_greenfrac+2m+albedo_ncep+maxsnowalb_ncep',
 dx        = 27000,
 dy        = 27000,
 map_proj  = 'mercator',
 ref_lat   = 27,
 ref_lon   = 105,
 truelat1  = 27.0,
 stand_lon = 105,
 geog_data_path = '/n/seasasfs02/hplin/geog'
/
The configuration options you need to change with a brief description are listed below. This will get you up and running fast, but we recommend checking out the WPS user’s guide.
max_dom: Number of domains. 1 = single domain, up to 8 are supported when working with nested domains. We do not discuss multiple domains here for simplicity.start_date(per-domain): Start date of simulationend_date(per-domain): End date of simulatione_weande_sn: Dimensions of the grid in x/y dimensions.dxanddy: Grid distance in the x/y dimensions where the map scale factor is 1. In meters whenmap_proj = 'mercator', in degrees whenmap_proj = 'lat-lon'.map_proj: Map projection. Only mercator and lat-lon (unrotated regular latitude-longitude) are supported currently in WRF-GC.ref_lat,ref_lon,truelat1,stand_lonetc. are grid location parameters (where your regional grid is located in). Refer to the WRF User’s Guide.geog_data_path: Path to the static WPS input data you downloaded in the previous steps.
Note
Starting in WRF version 4, the “default” geographical data has changed and uses the MODIS dataset unsupported by WRF-GC at this time. For WRFv4, you may need to use geog_data_res with the USGS dataset to get correct dry deposition velocities: gtopo_2m+usgs_2m+nesdis_greenfrac+2m+albedo_ncep+maxsnowalb_ncep is the recommended setting.
Once namelist.wps is configured, you can run GEOGRID:
./geogrid.exe
This will generate geo_em.d01.nc (1 domain) and other geo_em.d0X.nc files for other domains if you are using multiple domains.
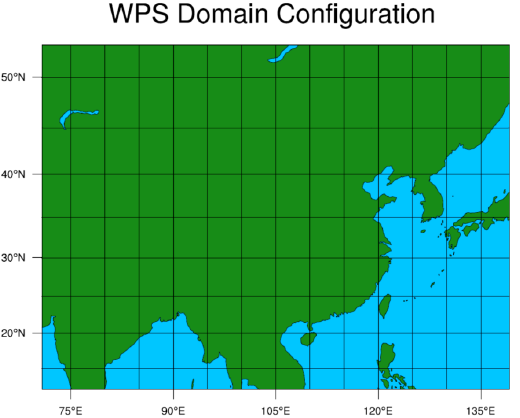
Preview the generated grid using the ncl script (requires NCL installed):
ncl util/plotgrids_new.ncl
An example is shown below:
Downloading meteorological data
Various types of meteorology can be used to drive WRF. We generally use NCEP FNL (Reanalysis) or GFS (Forecasts using GFS), but others may also be available. Refer to the WRF User’s Guide.
Setting up Vtable
Depending on the meteorological data, the appropriate Vtable needs to be linked so the UNGRIB utility can find it.
If you are using NCEP FNL or GFS data, link the Vtable.GFS into WPS directory:
ln -s ungrib/Variable_Tables/Vtable.GFS Vtable
Running UNGRIB and METGRID
Configure UNGRIB and METGRID in namelist.wps. These should be mostly unchanged:
&ungrib
        out_format = 'WPS',
        prefix = 'FILE',
/

&metgrid
        fg_name = 'FILE',
        io_form_metgrid = 2,
/
Link GRIB files - ./link_grib.csh gfs* (replace gfs* pointing to the meteorological input files you downloaded in the previous step)
Then run ./ungrib.exe, then ./metgrid.exe. You should now have meteorology data named met_em.d… in the WPS directory.
Link the meteorology from WPS to WRF
Go to the WRF run directory - WRF/run. Link the meteorological data into the run directory:
ln -sf ../../WPS/met_em* .
Configuring WRF-GC - namelist.input
Almost all WRF-GC configuration is performed inside namelist.input. This namelist, located in the WRF run directory, controls most aspects of the simulation.
Warning
Not all options in WRF for dynamics and physics are supported in WRF-GC! This is because to couple WRF to GEOS-Chem, the internal quantities need to be translated to GEOS-Chem’s meteorology format (based on GEOS-FP).
The list of supported schemes is available in Lin et al., 2020:
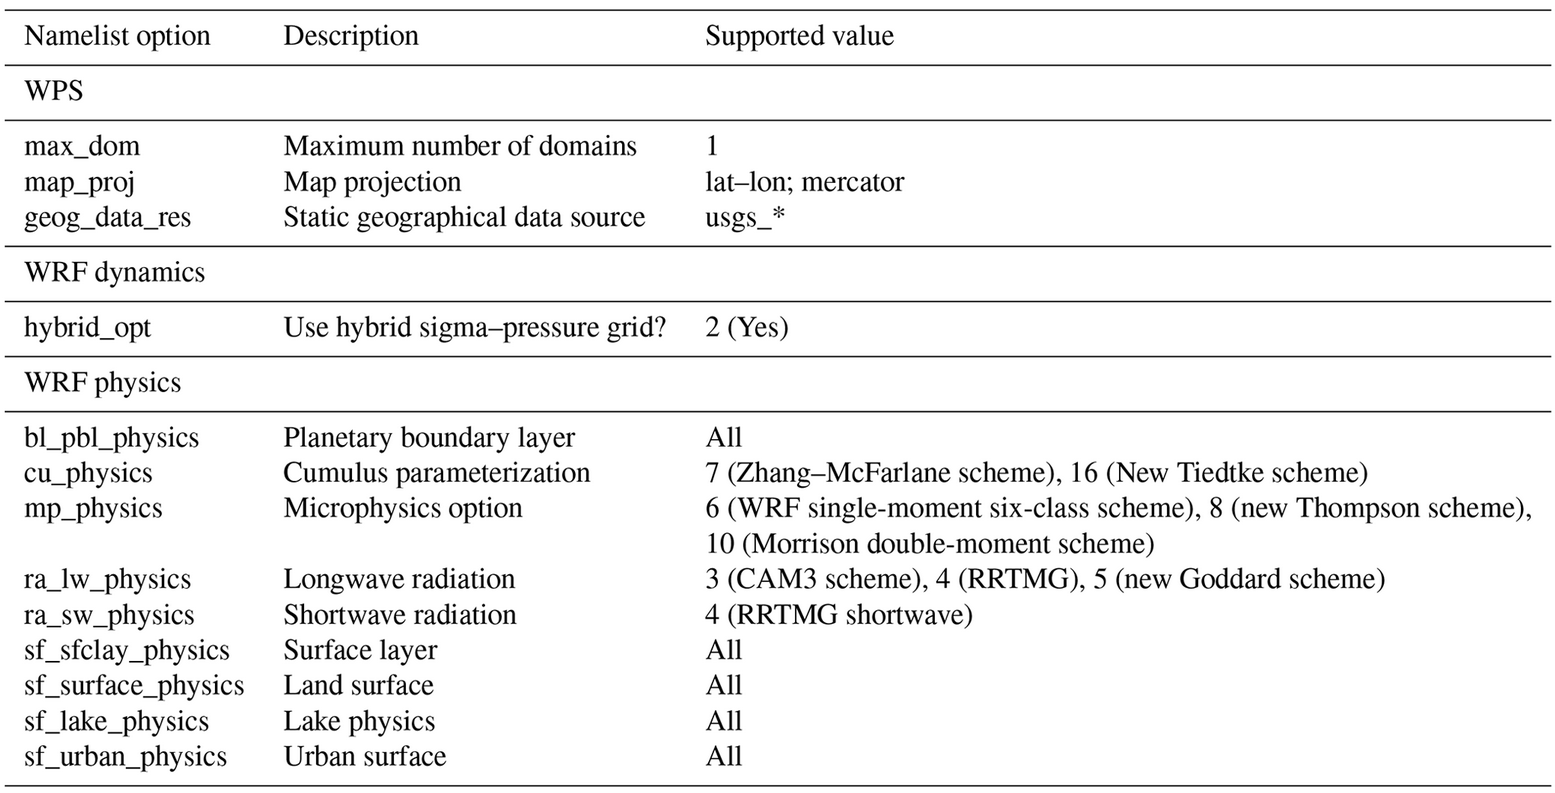
We do not discuss WRF configuration options in detail here and invite you to refer to the WRF User’s Guide. The basic options to change in namelist.input are:
&time_control
Configure the length of your run in
run_days/hours/minutes/seconds,start_year/month/day/hour/minute/second, etc.Configure output frequency. Use
history_interval(in minutes). e.g., hourly output -history_interval = 60.Configure frames per output netCDF file. e.g.,
frames_per_outfile = 2withhistory_interval = 60means 2 hours will be written per file.Restarts. If this is a restart run (running from existing
wrfrst_d<domain>_<date>file), setrestart = .true.. By default should be set to.false..Write out restart files. Set
restart_interval(in minutes).
&domains
Configure according to your namelist.wps.
If running nested domains and having complications getting the model to run successfully, you can turn off two-way nesting which passes information from the higher-resolution nests to the lower-resolution parent domains, using feedback = 0. Otherwise, use feedback = 1.
&physics
Microphysics scheme. (
mp_physics): We recommend the Morrison Double-Moment scheme (mp_physics = 10).Cumulus parameterization scheme. (
cu_physics): We recommend New-Tiedke scheme (cu_physics = 16).Prognostic aerosol information. For
prognsetting, see “Aerosol-Cloud Interaction” in the&chemsection below.Vertical grid configuration. You can configure the vertical grid using
p_top_requested(model top hPa) ande_vert(number of vertical levels) namelist options. You can see the computed levels after runningreal.exe, it will be part of the log file output. Advanced control of individual levels may also be available. Refer to the WRF User’s Guide.
&dynamics
Important advection options. It is very important to have advection setups chosen as:
chem_adv_opt = 2,
moist_adv_opt = 2,
scalar_adv_opt = 2,
tke_adv_opt = 2,
diff_6th_opt = 0
This is following the guidance in the WRF-Chem User’s Guide, which writes that “The above options should always be used when running chemistry simulations. The WRF advection scheme has the tendency to overshoot and produce locally unrealistically low values (referred to at times as digging holes) if those options are not turned on. This digging is stronger with stronger gradients like those found where there are high emission rates”.
&chem
Configuration of chemistry is within the &chem section.
For WRF-GC chemistry, set chem_opt = 233. Set chemdt = 10 for 27km and resolution and scale down for higher resolutions, including for nested domains.
You can control individual processes in GEOS-Chem using:
Convection:
gc_do_convectionEmissions:
gc_do_hemcoTurbulence / Boundary layer mixing:
gc_do_pblmixChemistry:
gc_do_chemistryDry deposition:
gc_do_drydepWet deposition:
gc_do_wetdep.
By setting these switches to 0 (off) or 1 (on).
If you have initial/boundary conditions, set chem_in_opt = 1 for each domain and have_bcs_chem = .true. for domain 1, .false. otherwise.
To configure some simple GEOS-Chem diagnostics, add options to &chem following the guide in Additional diagnostics.
To enable aerosol-radiation interactions or aerosol-cloud interactions, use:
Aerosol-radiation interactions:
aer_ra_feedback = 1Aerosol-cloud interactions:
aer_cu_feedback = 1. Also setprogn = 1in&physicssection.
If you have initial and boundary conditions: (you should), use:
have_bcs_chem = .true.(for nested-domains, set.true.for the first domain and.false.for others)chem_in_opt = 1for all domains.
Configuring WRF-GC - input.geos (or geoschem_config.yml)
GEOS-Chem version 12 and 13:
Most input.geos options known by GEOS-Chem users are not configured in input.geos in WRF-GC, and are instead controlled by namelist.input. Only two exceptions: the path to CHEM_INPUTS needs to be specified in:
Root data directory : /n/holyscratch01/external_repos/GEOS-CHEM/gcgrid/data/ExtData/
and
%%% PHOTOLYSIS MENU %%% :
FAST-JX directory       : /n/holyscratch01/external_repos/GEOS-CHEM/gcgrid/data/ExtData/CHEM_INPUTS/FAST_JX/v2021-10/
GEOS-Chem version 14 and above:
Most geoschem_config.yml options are controlled by namelist.input, except the file input paths:
root_data_dir: /n/holyscratch01/external_repos/GEOS-CHEM/gcgrid/data/ExtData
chem_inputs_dir: /n/holyscratch01/external_repos/GEOS-CHEM/gcgrid/data/ExtData/CHEM_INPUTS/

...

photolysis:
  input_dir: /n/holyscratch01/external_repos/GEOS-CHEM/gcgrid/data/ExtData/CHEM_INPUTS/FAST_JX/v2021-10/
and the Complex SOA option, which can be enabled and the Complex SOA species (TSOAx, ASOAx, …) need to be added to the advected species list.
Most other options in ``input.geos`` (or ``geoschem_config.yml``) for WRF-GC are ignored.
Configuring WRF-GC - emissions in HEMCO_Config.rc
Configuration of HEMCO is exactly the same as the GEOS-Chem model. Remember to update the HEMCO data path in this configuration file:
ROOT: /n/holyscratch01/external_repos/GEOS-CHEM/gcgrid/data/ExtData/HEMCO
Note
A reminder about input.geos, HEMCO_Config.rc, and namelist.input configuration files - these files are replaced every time the WRF model is recompiled (when ./compile em_real is ran). Please remember to back up your configuration files!
Starting in WRF-GC version 3.0, geoschem_config.yml and HEMCO_Config.rc are no longer replaced at each recompile. However, namelist.input is still replaced by WRF.
Running real.exe
After configuring, run real.exe. This is a memory and compute intensive operation - if you are on a cluster, you will need to submit a batch job like you would do when running other models. Otherwise, run
mpirun -np 32 ./real.exe
Where “32” would be the number of cores. The output can be watched by tail -f rsl.out.0000 and any errors would be in rsl.error.0000.
After running real.exe, the initial condition file wrfinput_d<domain> and boundary condition file(s) wrfbdy_d<domain> are generated.